
Native Science Activities
Activities
Transforming Spaces activities are designed in collaboration with spectrUM's Indigenous advisors. The Transforming Spaces curriculum includes low-cost, hands-on Native science education designed to be adaptable to various ages, classrooms, camps, and museums. Educators may request to reserve an activity trunk, which includes instructions, materials, and additional books and games written and produced by Indigenous authors and educators. Request a trunk by emailing spectrum@umontana.edu
In 2001, the Montana Office of Public Instruction published 7 Essential Understandings as guiding principles for Indian Education for All. Below are the Essential Understandings that the Transforming Spaces curriculum supports.
Essential Understanding 1
There is great diversity among the twelve sovereign tribes of Montana in their languages, cultures, histories, and governments. Each tribe has a distinct and unique cultural heritage that contributes to modern Montana.
- This curriculum was co-created and inspired by the unique culture and language of the Salish, Kootenai, Pend O’rielle, Blackfeet, Chippewa, Cree, Assiniboine, and Sioux. Each activity represents and honors aspects of the diversity among sovereign tribes in Montana.
Essential Understanding 2
Just as there is great diversity among tribal nations, there is great diversity among individual American Indians as identity is developed, defined, and redefined by entities, organizations, and people. There is no generic American Indian.
- Please take a moment to explore the role models of Transforming Spaces and SciNation. They demonstrate the uniqueness and diversity among individual Indigenous people.
Essential Understanding 3
The ideologies of Native traditional beliefs and spirituality persist into modern day life as tribal cultures, traditions, and languages are still practiced by many American Indian people and are incorporated into how tribes govern and manage their affairs. Additionally, each tribe has its own oral histories, which are as valid as written histories. These histories predate the “discovery” of North America.
- The activities in this curriculum are designed to allow students to explore various languages and the traditional ecological knowledge relating to botany, astronomy, wildfire, and bison. Find additional resources that share more stories about each theme in the Native STEM Stories page.
The Next Generation Science Standards (NGSS) are K–12 science content standards. Developed collaboratively across the nation, standards set the expectations for what students should know and be able to do. These standards are designed to give local educators the flexibility to adapt classroom learning experiences that inspires interest in science and prepares them for college, careers, and citizenship.
All spectrUM activities are designed with NGSS in mind. Here are some of the standards that the Transforming Spaces curriculum can support.
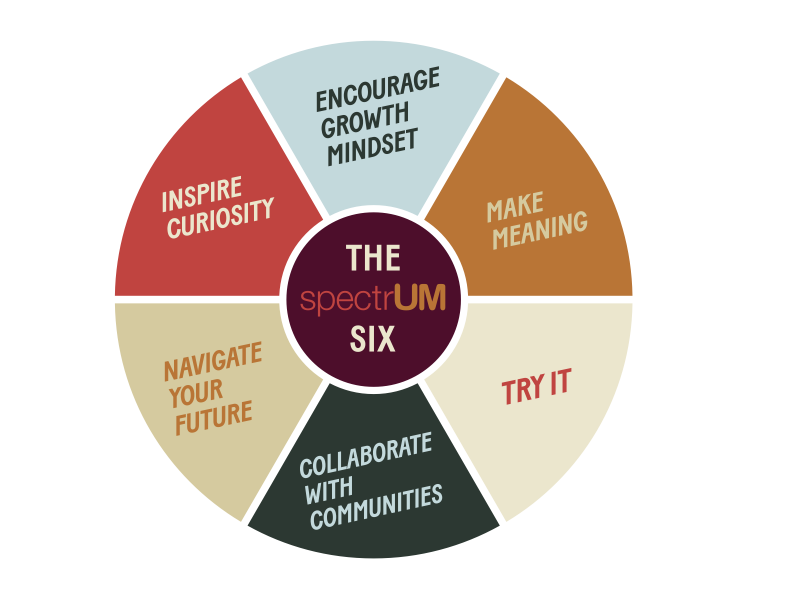
spectrUM's pedagogy, The spectrUM Six, provides guidance for supporting student learning.
Star Stories
|
Learning Objectives:
|
Prep Time: 15 - 30 minutes Duration: 25-50 minutes |
Learning content:
Astronomy is the scientific study of everything in outer space. Astronomers and other scientists study stars and galaxies, most of which are many light-years away from Earth. There are a few different definitions of constellations, but many people think of constellations as a group of stars. Often, it's a group of stars that looks like a particular shape in the sky and has been given a name. These stars are far away from Earth. They are not connected to each other at all. Some stars in a constellation might be close while others are very far away. But, if you were to draw lines in the sky between the stars like a dot-to-dot puzzle – and use lots of imagination – the picture would look like an object, animal, or person. Over time, cultures around the world have had different names and numbers of constellations depending on what people thought they saw. Today, there are 88 officially recognized constellations recognized by the International Astronomical Union. The constellations you can see at night depend on the time of year. Earth orbits around the Sun once each year. Our view into space through the night sky changes as we orbit. So, the night sky looks slightly different each night because Earth is in a different spot in its orbit. The stars appear each night to move slightly west of where they were the night before. Your location on Earth also determines what stars and constellations you see, and how high they appear to rise in the sky. The Northern Hemisphere is always pointing in a different direction than the Southern Hemisphere. This means that stargazers in Australia, for example, get a slightly different view of the sky and can see a few different constellations than those in the United States.
Stars and constellations stay in approximately the same spot for many, many years. They only appear to move in the sky during the year because we are on a moving planet. Because the constellations are in a fixed location, they are often used as landmarks in the sky. Many stars, nebulae, and other objects are named after the constellations they are found in. Known stars, such as those in well-known constellations, can also be used to navigate. For centuries, sailors used stars to determine their location when out at sea. This is called celestial navigation. NASA astronauts have also trained to use celestial navigation as a backup in case modern navigation systems have trouble. Studying the scientific properties of these objects in space helps us to understand how the universe was made, what else is out there, and how we fit in.
Astrology is not the same thing as astronomy. As a science, astronomy follows the scientific process involving evidence and data. Astrology is based on the belief that the location of certain stars and planets in the sky can predict the future or describe what a person is like. While astrology is important to some cultural traditions, its claims are not based on scientific evidence.
(NASA 2023)
|
Supplies: · Cardboard · Black pipe cleaners · Glow in the dark pony beads · Markers · Scissors |
Set Up: · Cut cardboard into a 6”x6” square for each student · Write the students names on the back of their cardboard. · Tape black paper over the cardboard on one side · Cut black pipe cleaners into various lengths, with a maximum length of 6” · Each student should have their own cardboard and ~8 pipe cleaners and beads. Students will need 1 bead per pipe cleaner. · Ensure that glow in the dark beads have had sufficient light exposure to glow. · Note: this activity works best in a dark room. · Create an example constellation so students clearly understand the goal of the project. |
Activity:
- Introduce the activity. When you look at the sky at night, what do you see?
- Show students the planisphere and ask them if they see any constellations that they recognize. What will those constellations look like from a different angle? What about from Mars?
- Invite students to imagine their own constellation using the planisphere. What does it look like? What story does it tell?
- Demonstrate your example constellation.
- Invite students to create their constellation using beads, pipe cleaners, and cardboard.
- Poke a small hole through the cardboard and thread the pipe cleaner through.
- On the back side of the cardboard, bend or knot the pipe cleaner so it doesn’t fall out.
- On the other side of the pipe cleaner, knot a bead so that it stays on the end of the pipe cleaner. The front side should have most of the pipe cleaner sticking all the way through, while the back just has the knotted end.
- The cardboard represents the black space between stars, the beads represent the stars, and the pipe cleaners help demonstrate that the sky is not flat; stars can have significant 3-dimensional distance between each other. From the front the stars should look like the constellation, but from the side or another angle it should look different.
- While students are building, listen the Indigenous star stories.
- When constellations are completed, invite students to share the stories of their constellation. Turn the lights off so students can see the constellation glow.
- Reflect and make comparisons about how constellation models look different from different angles.
spectrUM Pedagogy:
Inspire Curiosity: Ask open-ended questions and encourage creative thinking.
Encourage Growth Mindset: Building can be challenging and a point of frustration for some students. Encourage students and praise them on their effort and problem-solving skills.
Make Meaning: Create personal connections between science and students by asking them about their relationship with the stars.
Navigate Your Future: Let students know about resources and opportunities for them to continue to pursue an interest in astronomy, such as classes, clubs, camps, and higher education.
Collaborate With Communities: spectrUM has collaborated with many tribal representatives to connect science with Indigenous traditions. These resources can be found on spectrUM’s website, umt.edu/spectrUM.
Try It: Encourage student autonomy by providing them the opportunity to build their constellations and problem-solve independently.
Bison Bellow Instrument
|
Learning Objectives:
|
Prep Time: 15 minutes Duration: 15-30 minutes |
Learning content:
The largest terrestrial animals in North America, bison are characterized by a hump over the front shoulders and slimmer hindquarters. Both male and female bison have a single set of short, sharply pointed, hollow horns that curve outward and up from the sides of the massive head. The head, neck, forelegs, and front parts of the body have a thick coat of long, dark hair. The adult bull adds to this thick coat with a black beard about one foot long. The rear part of the body is covered with much shorter hair. The shaggy head is the most heavily insulated part of their body, which has adapted as such to withstand blizzards as the animal stands facing into the wind. Heavy coats are shed in the spring as the animals roll to loosen the hair, which falls off in gobs. A mature bull can reach 5.5 to 6.5 feet (1.9 meters) high at the hump and nine to 12.5 feet (2.7 to 3.8 meters) in length. Females are normally smaller, at 7 to 10 feet in length (2.2 to 3.2 meters) and 5 feet high at the hump (1.5 meters). Bison can weigh 1,800 to 2,400 pounds (816 to 1,088 kilograms).
At one time, bison were widespread from Alaska to northern Mexico, but the current range occupied by conservation herds has diminished to one percent of its original status due to colonial invasion and conflict against Indigenous people. Today, herds can be found in parts of Alberta, British Columbia, Manitoba, Northwest Territories, Ontario and Saskatchewan in Canada, as well as Arizona, California, Idaho, Montana, South Dakota, Utah, Alaska and possibly Texas in the United States. Modern conservation herds are substantially fragmented. Originally, bison were found primarily in the grasslands and prairie of North America. Today, bison distribution is greatly limited due to population decline and their movements are greatly regulated. Within the national parks, bison are found at all elevations.
Bison are year-round grazers. They feed primarily on grasses, but will also consume flowering plants, lichens and woody plant leaves depending upon availability. To find grass in winter they sweep their heads from side to side to clear the snow. On the average, bison ingest 1.6 percent of their body mass per day of dry vegetation. Bison require water every day as well. Bison are usually found in bands arranged by sex, age, season, and habitat. Older bulls are often solitary. Both cows and bulls live in a dominance hierarchy, which is established early in life. Most of the year, females with young form small bands, and immature bulls may stay with them. The bands may congregate in large herds in the spring or fall to search for food or water. Mature males have their own groups that may reach up to 30 individuals. Grazing takes place during several periods each day and is conducted in loose groups. When bison travel, they form a line. Bison are also adept swimmers, able to cross streams and rivers without difficulty. The life expectancy of American bison is 15 to 20 years. Adult bison are relatively safe from natural predators; however, weak, old or young bison may fall prey to mountain lions, bears or wolves.
Bison communicate through grunts to maintain contact with each other and will snort to warn intruders. Male bison display their fitness by charging and butting heads with other bulls. They also bellow hoarsely, lower their heads, and paw the earth defiantly, but they rarely fight to the death. Bulls may bellow when threatening each other. This sound has been compared to a lion's roar and can be heard up to 5 km (3 mi) away. (Meagher 1986) (Buchholtz & Sambraus 1990). They have an excellent sense of hearing and smell, but cannot see very well, so an entire herd can stampede if it is startled. Bison have cloven hoofs and can reach speeds of 30 miles per hour.
(Smithsonian’s National Zoo & Conservation Biology Institute)
|
Supplies: · Paper cups (one per group/ student) · Corrugated material, metal works best (one piece per group/ student) · Various other household materials, such as funnels, bowls, string, coat hangers, etc. · Online recordings of bison sounds · Images and videos of bison Optional additions available in spectrUM's Transforming Spaces trunks: · Felted bison · Bison anatomy images · Bison horn · Bison toe |
Set Up: · Have bison images and videos ready for discussion. · Remaining assorted materials will be used to create an instrument and should be divided for students to use independently or in groups. · Prepare a recording of bison sounds to share with students. The National Park Service website has a page with different bison sounds, “The Bison Bellow”. · Provide bison horns, toes, and felted animals for students to touch and explore. |
Activity:
- Introduce the activity. What do bison look like? What do they sound like?
- Disseminate bison materials, such as the horns, toes, and felted animals, for students to handle and discuss their observations.
- Show bison images and videos and discuss behavior. Why do bison live in groups? Why do bison have horns? Why do bison have long and short hair?
- Play a recording of the sounds for the group. Why do bison make sounds?
- Show students different assorted materials, such as funnels, cardboard, string, and bowls. Invite them to engineer an instrument that recreates the bison sound using the materials. Note: one way to recreate the sound is by dragging the edge of a paper cup against corrugated metal - use speed to change the pitch of the sound.
- Invite students to play their instruments together to imitate a herd of bison.
Extensions:
- Explore the science of sound: sound travels in compression waves differently through different material, such as the gas making the air around us, water, or string. Using two cups connected by a taut string creates a “telephone affect” where one student speaks into the cup while the other listens through their cup on the other side of the string.
- Invite students to find ways to create other animal sounds.
- Invite students to explore the different sounds they can make using the bison materials.
spectrUM Pedagogy:
Inspire Curiosity: Ask open-ended questions and encourage creative thinking.
Encourage Growth Mindset: Building can be challenging and a point of frustration for some students. Be available to help students when invited, do not build their instruments for them. Encourage students and praise them on their effort and problem-solving skills.
Make Meaning: Create personal connections between science and students by asking them about their relationship with bison and other animals.
Navigate Your Future: Let students know about resources and opportunities for them to continue to pursue an interest in wildlife, such as classes, clubs, camps, and higher education.
Collaborate With Communities: spectrUM has collaborated with many tribal representatives to connect science with Indigenous traditions. These resources can be found throughout spectrUM’s Transforming Spaces and SciNation webpages.
Try It: Encourage student autonomy by providing them the opportunity to build their instruments and problem-solve independently.
Hide Insulation
|
Learning Objectives:
|
Prep Time: 15 minutes Duration: 30-60 minutes
|
Learning content:
Every year when mid-winter arrives, snow can blanket Montana, temperatures can drop well below zero, and the winds can howl unmercifully, and yet bison remain alive and well on the hostile landscape. Indeed, bison have evolved digestive, physiological, and behavioral strategies that allow them to survive some of the harshest weather in North America.
Under cold stress, bison have developed the adaptation to minimize nutritional needs and slow their metabolism to conserve energy. Metabolism is a term used to describe the process by which our bodies convert food into energy. People say bison during the winter are time minimizers rather than energy maximizers. In other words, bison cannot merely eat more food more often to compensate for the low nutritional forage they eat. Instead, they slow down their metabolisms, the amount of time they spend foraging, and the amount of food they consume in order to conserve energy. Bison also have the ability to generate internal body heat through digestion. Forage is retained longer in their gut — due to the increase of indigestible plant material found in the winter — which allows them to eat less but still receive the nutrition they require. Without these adaptations, surviving the freezing temperatures and blizzard storms would not be possible.
During the cold winter season, bison develop thick, woolly coats that help protect them from freezing temperatures and harsh winds. It is said that a bison's winter coat is so thick and provides insulation so effective that when snow accumulates on its coat, it will not melt from the heat of the bison's skin. Their skin also thickens in response to cold temperatures and fatty deposits appear to insulate the animal. Insulation is about separating something hot from something cold so that the heat doesn’t transfer. This is important because during winter storms, bison will actually turn toward the storm, hunker down, and wait for it to pass. With thick coats and creating a low profile, bison can survive the same storm that would kill many domestic livestock. Bison also have the ability to use their large head and massive neck and shoulder muscles as snow plows to forage in snow as deep as four feet! Some cultures use bison and other animal hide as coats and blankets to stay warm.
(National Park Service)
|
Supplies: · Ice cubes (1 per student) · Plastic bags (1 per student) · Fabrics with various thicknesses · Poly-Fil and/or cotton balls · Thermometers · Rulers · Scratch paper · Pencils |
Set Up: · Put individual ice cubes in plastic bags and set in a freezer or ice box until the activity starts · Separate types of fabric, cotton, and Polyfill into sets so that each student has 1 type of material to use · Set out scratch paper and pencils for students to mark down measurements · Have thermometers and rulers ready for each student to measure the ice melt · Prepare images and videos of bison to support discussion. |
Activity:
- Introduce the activity: How do you stay warm when it’s cold outside? How do you think bison stay warm in the winter?
- Show images and videos of bison and make observations about their adaptations to cold weather. Introduce the concept of insulation.
- Show students their fabric and cotton insulation materials for the day, and tell them their mission is to use their “hide” like a coat to prevent the warm room from melting an ice cube.
- Give students ice cubes, keeping them in plastic bags to prevent mess, and ask them to measure the longest and shortest sides of their ice cube, marking the measurement on a piece of paper.
- Using their materials, invite students to experiment with insulating their ice cube.
- As a control, set one ice cube out with no insulation for students to compare.
- When everyone is finished insulating their ice cube, set a timer at an interval that works best for your group (ideally between 30 and 60 minutes). When the timer goes off, invite students to measure their ice cubes again. Whoever’s ice cube has shrunk the least has the best insulation technique and material.
- Reflect and discuss comparisons between technique, material, and rate of melt.
Extensions:
- Students may measure their ice cubes at shorter intervals before the timer goes out. For example, every 10 minutes students may use a ruler and note how much smaller their ice cube is.
- Use a temperature gun or thermometer to measure changes in the water, fabric, and ambient air.
- Older students may graph the changes occurring as the ice cube melts.
- As students wait for the timer, watch OPI’s videos about buffalo jumps, or other Indigenous stories on spectrUM’s website.
- As students wait for the timer, invite them to create artwork about bison. Artwork about bison is a traditional Indigenous method of self-expression, cultural expression, and reverence for the animal.
- Weigh the ice cube at the beginning of the experiment, then at the end to compare.
spectrUM Pedagogy:
Inspire Curiosity: Ask open-ended questions and encourage creative thinking.
Encourage Growth Mindset: Measuring can be challenging and a point of frustration for some students. Be available to help students when invited, do not measure for them. Encourage students and praise them on their effort and problem-solving skills.
Make Meaning: Create personal connections between science and students by asking them about their relationship with bison and other animals.
Navigate Your Future: Let students know about resources and opportunities for them to continue to pursue an interest in wildlife, such as classes, clubs, camps, and higher education.
Collaborate With Communities: spectrUM has collaborated with many tribal representatives to connect science with Indigenous traditions. These resources can be found on spectrUM’s website, umt.edu/spectrUM.
Try It: Encourage student autonomy by providing them the opportunity to insulate, measure, and problem-solve independently.
Building Pollinators
|
Learning Objective: Learn about pollinators. |
Prep Time: 5-10 minutes Duration: 20-40 minutes |
Learning content:
The goal of every living organism, including plants, is to create offspring for the next generation. Pollination is the act of transferring pollen grains from the male anther of a flower to the female stigma. One of the ways that plants can produce offspring is by making seeds. Seeds contain the genetic information to produce a new plant. Flowers are the tools that plants use to make their seeds. The basic parts of the flower are shown in the diagram below. Seeds can only be produced when pollen is transferred between flowers of the same species. A species is a group capable of producing offspring with each other, but not another group.
Pollen from the stamen of Flower 1 is deposited on the stigma of Flower 2. Once on the stigma, pollen may “germinate,” which means that a “pollen tube” forms on the sticky surface of the stigma and grows down into the ovule of the plant.
While some flowers can self-pollinate, many rely on outside sources to move their pollen, such as wind, water, birds, bees, butterflies, humans, bats, and other animals. We call animals or insects that transfer pollen from plant to plant “pollinators”. The pollinator is often eating or collecting pollen for its protein and other nutritional characteristics, or it is sipping nectar from the flower when pollen grains attach themselves to the animal’s body. When the animal visits another flower for the same reason, pollen can fall off onto the flower’s stigma and may result in successful reproduction of the flower, therefore they’re usually unaware that they’re pollinating.
(U.S. Department of Agriculture 2023)
|
Supplies: · Images of various pollinators · Assorted pipe cleaners · Assorted construction paper · Assorted markers · Assorted beads · Assorted pompoms · Flowers or paper flowers · Glue · Scissors · Native endemic plant card games (available in spectrUM's Transforming Spaces trunk) |
Set Up: · Organize craft supplies for students to share · Build example pollinators using craft supplies · Create paper flower, or have real flowers prepared for students to investigate |
Activity:
- Introduce the concept of pollinators. What kind of plants have you seen growing nearby? What makes those plants grow?
- Show students example pollinators made from craft supplies. Use examples to demonstrate how those creatures pollinate.
- Invite students to make their own pollinators with craft supplies
- Invite students to use their pollinators to mimic pollination with the prepared paper flowers or real flowers.
- Reflect. How do you think your animal pollinates? How can we help plants grow and protect pollinators?
Extensions:
- You can purchase real pollen online for student to explore using their hands, magnifying glasses, and microscopes.
- Learn about traditional Indigenous uses of plants online and Native endemic plant card games (included in spectrUM's Transforming Spaces trunks).
spectrUM Pedagogy:
Inspire Curiosity: Ask open-ended questions and encourage creative thinking.
Encourage Growth Mindset: Building can be challenging and a point of frustration for some students. Be available to help students when invited, do not build their pollinators for them. Encourage students and praise them on their effort and problem-solving skills.
Make Meaning: Create personal connections between science and students by asking them about their relationship with plants.
Navigate Your Future: Let students know about resources and opportunities for them to continue to pursue an interest in botany and pollinators, such as classes, clubs, camps, and higher education.
Collaborate With Communities: spectrUM has collaborated with many tribal representatives to connect science with Indigenous traditions. These resources can be found on spectrUM’s website, umt.edu/spectrUM.
Try It: Encourage student autonomy by providing them the opportunity to build their pollinators and problem-solve independently.
Plant Dissection
|
Learning Objective: Learn about plant anatomy.
|
Prep Time: 10 minutes Duration: 30-50 minutes |
Learning content:
Hundreds of thousands of different species, or kinds, of plants grow on Earth. Some plants are so tiny that people can hardly see them. Others are trees that grow as tall as skyscrapers. Most plants have several things in common: they need sunshine, water, and air to grow. Their cells have stiff walls made of a tough material called cellulose. All green plants use the Sun’s energy, water, and a gas called carbon dioxide to make their own food. This process is called photosynthesis.
Plants grow nearly everywhere on Earth. Most plants grow in soil, where they get their water and nutrients. But some plants do not need soil. Plants called epiphytes grow on hard surfaces, such as other plants or rocks, where they get most of the water and nutrients they need from rain and the air. Still other plants float in water. A few species of plant live on and get their nutrients from other plants.
All plants belong to one of two main groups, vascular plants and nonvascular plants. Vascular plants have special tissues, called xylem and phloem, that carry water and food throughout the plant. Vascular plants also have roots, stems, and leaves. Vascular plants include herbaceous plants, shrubs, and trees. Herbaceous plants have soft stems. Shrubs and trees have woody stems. Nonvascular plants do not have xylem or phloem. They also lack true roots, stems, and leaves. Nonvascular plants include mosses, liverworts, and hornworts. They are generally small and grow in moist places.
Plants reproduce, or make more of their kind, either by seeds or spores. Seeds and spores are small structures that develop on plants and then fall off. They then may grow into new plants. Seeds are larger and more complex than spores. Most vascular plants reproduce by seeds. Most seed-bearing plants grow flowers. Fruits grow from the flowers, and seeds grow inside the fruits. Other vascular plants do not grow flowers or fruits. For example, the plants called conifers form their seeds inside cones. Conifers include pines, spruces, firs, and similar trees and shrubs. Nonvascular plants reproduce by spores. A few kinds of vascular plants, such as ferns, also reproduce by spores. Sometimes plants can reproduce without spores or seeds. Stems, leaves, or other parts of a plant may grow into new plants. For instance, strawberry plants grow runners, or stems that creep along the ground. These stems may form roots and grow into new plants. This process is called vegetative reproduction.
Plants are vital to life on Earth. They provide food for people and animals. They also make the oxygen that other living things breathe. Plants produce the oxygen as part of the process of photosynthesis. Human beings use plants in countless ways. We get many foods, drinks, and flavorings from plants. We build homes from wood and many other parts of plants. People also burn wood for heat and energy. Many of the fibers used to make cloth come from plants, especially cotton. Other useful things made from plants include medicines, paper, chewing gum, cork, rubber, and cocoa butter. People also use flowers for decoration. We plant trees and flowers in our yards and in large formal gardens.
(Britannica Kids 2023)
|
Supplies: · Plants to dissect (e.g. tomato, avocado, flowers, peaches…) · Knife or scalpel · Cutting board or dissecting tray · Gloves (if necessary) · Diagram of plant to reference during dissection |
Set Up: · Set up cutting board/trays and the plants either for individuals, groups, or demonstration · Keep dissection instrument safely out of reach until safety expectations are established · Set up plant diagram(s) |
Safety:
Establish expected behavior and safety rules with students regarding the use of scalpels and knives before the activity. spectrUM does not allow students to perform dissections independently.
Activity:
- Show students the plant that will be dissected and make observations and predictions about what’s inside. Have you seen this plant before? Does it look like other plants you’ve seen?
- Invite students to gently touch and explore the whole plant before the dissections. What do you think is inside the plant? Why do you think it’s that color? Why would it grow into that shape?
- Show students the diagram of the plant and invite them to make connections between the image and the dissected plant.
- Cut the plant down the middle. Invite students to gently handle the plant, make observations, and discuss.
- Reflect.
Extensions:
- Build time for students to collect plants outside to dissect (discuss when and where it’s appropriate to collect plants).
- Invite students to “dissect” plants with scissors.
- Use magnifying glasses or microscopes explore plants closely and make comparisons.
- Older students can be encouraged to identify plant anatomy during the dissection and may label a plant diagram (many are available for free online).
- Discuss traditional uses of plants.
spectrUM Pedagogy:
Inspire Curiosity: Ask open-ended questions and encourage creative thinking.
Encourage Growth Mindset: Show students how to navigate the diagram and encourage them to use it during the dissection. Be available to help students when invited.
Make Meaning: Create personal connections between science and students by asking them about their relationship with plants.
Navigate Your Future: Let students know about resources and opportunities for them to continue to pursue an interest in botany, such as classes, clubs, camps, and higher education.
Collaborate With Communities: spectrUM has collaborated with many tribal representatives to connect science with Indigenous traditions. These resources can be found on spectrUM’s website, umt.edu/spectrUM.
Try It: Encourage student autonomy by providing them the opportunity to build their pollinators and problem-solve independently.
The Three Sisters
|
Learning Objectives:
|
Prep Time: 10 minutes Duration: 30 Minutes
|
Learning content:
Corn, beans, and squash make up the Three Sisters. From the Northeast to the Southeast, from the Plains to the Southwest and into Middle America, many Indigenous communities grow varieties of this trio. The name, the “Three Sisters,” comes from the Haudenosaunee (Iroquois). Different communities have stories; the common thread is that the three sisters are very close – stronger together than apart. The three are one form of companion planting – an agricultural technique where two or more crops are planted together in a single plot. The three function as a unit to provide higher crop yield; they help each other grow by creating a fertile soil that resists damage from diseases and insects that would normally consume and destroy them. Corn stalks provide a pole for the beans to wrap themselves around and help to stabilize the corn in wind. Beans provide nitrogen to fertilize the soil. The large, spiny squash leaves provide shade, help the soil retain moisture, prevent weed growth, and discourages insects from invading. Each of the three attracts beneficial insects that prey on those that are destructive.
When eaten together, corn, beans and squash are a complete and balanced meal. Corn is low in protein but provides carbohydrates. Beans are a rich source of protein and have amino acids missing in corn. Squash provides different vitamins and minerals than corn or beans. All three can be dried and used for food year-round.
(Indian Pueblo Cultural Center 2021)
|
Supplies:
Optional:
|
Set Up:
|
Activity:
- Introduce the activity: What do you notice about the different materials in this bowl? What kinds of plants do you think might grow out of them?
- Invite students to make observations and experiment with the seeds. Invite the students to match the seeds to images of plants.
- Show students the photos (or actual vegetables) of the Three Sisters. Describe the plants and how they grow together. Do you think there are other plants and animals that grow symbiotically? What are things that people do to help plants grow?
- Read The Three Sisters book and discuss the stories. Have you ever grown these plants before? Do you think beans, corn, and squash taste good together?
- Invite students to think about or share what plants and foods are important to their families and friends.
Extensions:
- Invite students to grow their own Three Sisters garden at home.
- Make Three Sisters soup together or in advance to try as a group.
- Dissect the seeds and make observations.
- Using art supplies like pipe cleaners and beads, invite students to create small models or key chains of corn, beans, and squash to take home.
spectrUM Pedagogy:
Inspire Curiosity: Ask open-ended questions and encourage creative thinking.
Encourage Growth Mindset: Encourage students to continue to guess and use critical thinking skills when matching photos of plants to their seeds. Praise their patience and be available to help when invited. Do not give away the answer right away.
Make Meaning: Create personal connections between science and students by asking them about their relationship with plants and food.
Navigate Your Future: Let students know about resources and opportunities for them to continue to pursue an interest in botany, such as classes, clubs, camps, and higher education.
Collaborate With Communities: spectrUM has collaborated with many tribal representatives to connect science with Indigenous traditions. These resources can be found on spectrUM’s website, umt.edu/spectrUM.
Try It: Encourage student autonomy by providing them the opportunity to build their pollinators and problem-solve independently.
Matchstick Forest
This activity has been modified from the FireWorks Educational Program designed by the Missoula Fire Lab.|
Learning Objectives:
|
Prep Time: 25-85 minutes Duration: 35 minutes
|
Learning content:
Forests change over time in the process called succession. Fire is a dramatic force for change, but change occurs without fire, too. Some plants need sunny openings to grow well, so they thrive in the first years after fire, and some animals thrive on these plants. Other plants reproduce almost anywhere, even in deep shade. They may thrive in places not burned for a long time, and the animals that depend on them are present only in old forests. Some plants and animals can live almost anywhere, regardless of when a fire occurred or how the forest changes. Most wildfires occur in hot, dry months and start with a lightning strike. Wildfires are a natural part of the seasonal cycle, but have become more frequent and extreme due to climate change. Wildfires affect humans when they are near population centers. Wildfires are affected by variations in weather, topography, and fuel, known as the Wildfire Triangle.
Knowing how a wildfire may behave is key to control and management. Many factors affect how a wildfire burns, how fast it moves and how difficult it is to control. The three sides of the fire behavior triangle are weather, topography and fuels.
Weather includes wind, temperature, cloudiness, moisture and air pressure. High temperatures and low humidity cause vegetation to dry and wildfires to burn rapidly. Wind not only moves wildfires across landscapes, but also supplies oxygen that can cause fires to grow swiftly. Wind also blows embers for miles, igniting new spot fires. Rain and high humidity can slow or extinguish fires, while storms can cause fire activity to increase or become completely unpredictable.
Topography describes the physical features of an area, including slope and aspect (the direction it faces). Wildfires burn more rapidly when moving up a slope by preheating unburned fuels and making them more combustible. Wind also moves more rapidly up slopes, increasing the speed at which a fire can spread. Draws can act like chimneys and funnel flames upwards. South- and west-facing slopes have drier fuels than north- and east-facing slopes.
Fuels are vegetation and structures. Their characteristics have a great effect on wildfire behavior. Large, dense trees burn for hours and generate a lot of heat. Dried grasses, on the other hand, produce a flashy fire that burns quickly and does not generate much heat.
(Missoula Fire Sciences Laboratory)
Research around home destruction vs. home survival in wildfires point to embers and small flames as the main way that the majority of homes ignite in wildfires. Embers are burning pieces of airborne wood and/or vegetation that can be carried more than a mile through the wind can cause spot fires and ignite homes, debris and other objects.
There are methods for homeowners to prepare their homes to withstand ember attacks and minimize the likelihood of flames or surface fire touching the home or any attachments. Experiments, models and post-fire studies have shown homes ignite due to the condition of the home and everything around it, up to 200’ from the foundation. This is called the Home Ignition Zone (HIZ). The concept of the home ignition zone was developed by retired USDA Forest Service fire scientist Jack Cohen in the late 1990s, following some breakthrough experimental research into how homes ignite due to the effects of radiant heat. The HIZ is divided into three zones.
The Immediate Zone: The home and the area 0-5’ from the furthest attached exterior point of the home; defined as a non-combustible area. Science tells us this is the most important zone to take immediate action on as it is the most vulnerable to embers.
Prevent fire by: Moving any flammable material away from wall exteriors – mulch, flammable plants, leaves and needles, firewood piles – anything that can burn; removing anything stored underneath decks or porches; cleaning roofs and gutters of dead leaves, debris and pine needles that could catch embers. Start with the house itself, then move into the landscaping section of the Immediate Zone.
Intermediate Zone: 5-30’ from the furthest exterior point of the home.
Prevent fire by: employing careful landscaping or creating breaks that can help influence and decrease fire behavior; clearing vegetation from under large stationary propane tanks; keeping lawns and native grasses mowed to a height of four inches.
Extended zone: 30-100 feet, out to 200 feet. Landscaping – the goal here is not to eliminate fire but to interrupt fire’s path and keep flames smaller and on the ground. Prevent fire by: disposing of heavy accumulations of ground litter/debris; removing dead plant and tree material; removing small conifers growing between mature trees.
|
Supplies: · Matches · Matchstick boards (flame resistant 6” by 6” board with 49 holes in a grid for students to insert matches, see photo below) · Baking trays · Fire extinguisher · Spray bottles filled with water · Matchstick board nuts and bolts (to adjust slope of board · Lighter |
Set Up: · Using the matchstick board nuts and bolts, set each board at the same slope. · Place matchstick boards on baking trays. · Count the same number of matchsticks for each board and set aside. · Set up a “control” board by placing matches in every slot in a board at the same height with no variable. · Indicate on each matchstick board where a building might be by marking that spot with an “X”. Note that they should be in different locations for each matchstick board. Break a matchstick in half and place in the slot where the building is supposed to be. · Locate a safe space outdoors to light the matchstick forests. |
Safety:
Set boundaries and expectations for students to remain safe during fire experiments.
- Baking trays, matchstick boards, fire extinguisher, and spray bottle should be made readily available to ensure the fire is contained.
- Matchstick forests should be lit outdoors on a paved surface and on a baking sheet, under the supervision of an adult, with a fire extinguisher and spray bottle handy.
Activity:
- Introduce the activity. What happens during a wildfire?
- Discuss the Wildfire Triangle. What changes might cause a wildfire to behave differently? What changes can people make to be safer around wildfires?
- Split the class into groups and introduce the problem they will be solving. Scientists use small models to test their hypotheses: There is a wildfire happening near a building, how can you landscape the ground to save the building from burning?
- Students must use all the matches. Students may break matches to use as “fallen trees” or understory. Students may not make any other alterations to their matches or board. Students may not light their matchstick forest.
- When matchstick forests are complete, each group should share their design with the class and make predictions about how a wildfire will behave on their board.
- Lead students outside with their matchstick boards and discuss what external things may affect the behavior of their wildfires using the Wildfire Triangle. Discuss how the wildfire triangle might impact their matchstick forests – what are the weather, topography, and fuel conditions?
- Review ways to stay safe.
- Light matchstick forests and invite students to make observations and comparisons. Note: using a lighter rather than matches will ignite the forests more easily in outdoor conditions.
- Light the control forest: in scientific experiments a control is one in which the subject or a group would not be tested for the dependent variable(s).
- Bring students inside to discuss their observations.
- Use the Fired up for Land Preservation book to reflect and learn Indigenous perspectives about wildfire and land management (available for check out in the Transforming Spaces activity trunk).
Extension:
- Limiting changes during an experiment and making comparisons across the group helps students learn how that change impacts fire behavior. Extend the activity by experimenting with more variables:
- Changing slope – how does fire behave on a steeper mountain or flat prairie?
- Changing fuel – how does fire behave with more or less matchsticks?
- Changing weather – how does fire behave with a fan or wet matches?
- Use sensors to explore how fire changes humidity, temperature, or carbon dioxide levels.
spectrUM Pedagogy:
Inspire Curiosity: Ask open-ended questions and encourage creative thinking.
Encourage Growth Mindset: Encourage students to use critical thinking when changing the landscape of the matchstick forest. Praise their patience and be available to help when invited. Do not give away the answer right away.
Make Meaning: Create personal connections between science and students by asking them about their relationship with fire and land.
Navigate Your Future: Let students know about resources and opportunities for them to continue to pursue an interest in wildfire, such as classes, clubs, camps, and higher education.
Collaborate With Communities: spectrUM has collaborated with many tribal representatives to connect science with Indigenous traditions. These resources can be found on spectrUM’s website, umt.edu/spectrUM.
Try It: Encourage student autonomy by providing them the opportunity to participate as much as possible.
The Fire Triangle
This activity has been modified from the FireWorks Educational Program designed by the Missoula Fire Lab.
|
Learning Objectives:
|
Prep Time: 15 minutes Duration: 30 minutes
|
Learning content:
Fire is a chemical reaction that converts a fuel and oxygen into carbon dioxide and water. It is an exothermic reaction, in other words, one that produces heat. The three requirements for fire are conceptualized in the Fire Triangle: oxygen, fuel, and heat. If a fire runs out of any of these things, it will stop. Combustion, or burning, is a high-temperature exothermic redox chemical reaction between a fuel and an oxidant, usually atmospheric oxygen, that produces oxidized, often gaseous products, in a mixture termed as smoke. (Missoula Fire Sciences Laboratory)
|
Supplies: · Baking tray(s) · Matchstick stand (such as a ring stand with alligator clips, see photo below) · Matchsticks · Ash tray · Spray bottle full of water · Fire extinguisher · Small bowl of water · Plastic take-out container (note: the container must be a few inches wider and taller than the candle) · Candle (votive candles work best) · Baking soda · Vinegar · Graphic of the fire triangle (optional) |
Set Up: · Soak a matchstick in a bowl of water for use later. Note: the matchstick must soak for at least ten minutes to begin to saturate enough. · Put matchstick stand on baking tray · Put candle in the Tupperware container · In the matchstick stand, clip one match head-up, and on the opposite side, another match head-down · Practice testing the fire triangle before doing the experiments with students for best results.
|
Safety:
Set boundaries and expectations for students to remain safe during fire experiments. Baking trays, ash trays, matchstick stand, fire extinguisher, and spray bottle should be readily available to ensure the fire is contained.
Activity:
- Introduce the activity: What do you use to build a camp fire? How are you safe around fire? How can we be safe doing fire experiments today?
- Show students the fire triangle and discuss. How does the fire triangle relate to wildfires?
- Test fuel:
- Ask students to make predictions about which match will burn faster, the one head-down or head-up?
- Light both matches at the same time.
- Discuss the results. The head-down match should burn faster because heat rises, and the fuel is above the head of the match.
- Test heat:
- Ask students to make predictions about what might happen when attempting to light a wet match.
- Attempt to light the wet match.
- Discuss the results. The match should not catch fire as quickly as a dry match because the heat needs to first evaporate the water before it can access and burn the fuel. The wet match cannot get hot as quickly. Note: ensure that the wet match is thoroughly saturated with water, if only a little wet it will still catch fire quickly.
- Test oxygen:
- Ask students if they have ever mixed vinegar and baking soda together. Mixing vinegar and baking soda produces bubbles of carbon dioxide, the same gas that humans exhale. Fire needs oxygen, the same gas humans need to breathe.
- Light the candle and place inside the plastic container. Ask students to make predictions about what might happen if you mix baking soda and vinegar at the bottom of the container. Clarify that you won’t pour the mixture on top of the flame, but create the bubbles around the bottom of the candle.
- Carefully pour ½ a table spoon of baking soda and 3-4 table spoons of vinegar at the bottom of the container beside the candle. Note: measurements will vary based on the height of the candle and volume of the container, take care to try the experiment in advance to find the best measurements.
- Discuss the results. The candle should extinguish because the baking soda and vinegar mixture produces carbon dioxide. Carbon dioxide is heavier than oxygen and will fill the container, which displaces the oxygen needed to produce fire.
- Use the Fired up for Land Preservation book to reflect and learn from Assiniboine and Sioux perspectives about wildfire and land management (available for check out in the Transforming Spaces activity trunk).
Extension:
- Older students may test the fire triangle with alongside the teacher.
spectrUM Pedagogy:
Inspire Curiosity: Ask open-ended questions and encourage creative thinking.
Encourage Growth Mindset: Encourage critical thinking stills as students predict changes and make observations.
Make Meaning: Create personal connections between science and students by asking them about their relationship with fire.
Navigate Your Future: Let students know about resources and opportunities for them to continue to pursue an interest in fire, such as classes, clubs, camps, and higher education.
Collaborate With Communities: spectrUM has collaborated with many tribal representatives to connect science with Indigenous traditions. These resources can be found on spectrUM’s website, umt.edu/spectrUM.
Try It: Encourage student autonomy by providing them the opportunity to participate as much as possible.
Wildfire Story
This activity has been modified from the FireWorks Educational Program designed by the Missoula Fire Lab.
|
Learning Objectives:
|
Prep Time: 10-60 minutes Duration: 40 minutes |
Learning content:
Forests change over time in the process called succession. Fire is a dramatic force for change, but change occurs without fire, too. Some plants need sunny openings to grow well, so they thrive in the first years after fire, and some animals thrive on these plants. Other plants reproduce almost anywhere, even in deep shade. They may thrive in places not burned for a long time, and the animals that depend on them are present only in old forests. Some plants and animals can live almost anywhere, regardless of when a fire occurred or how the forest changes. Most wildfires occur in hot, dry months and start with a lightning strike. Wildfires are a natural part of the seasonal cycle, but have become more frequent and extreme due to climate change. Wildfires affect humans when they are near population centers.
(Missoula Fire Sciences Laboratory)
|
Supplies: · Trees (made out of paper or felt) · Forest animals (paper or felt) · Logs (paper or felt) · Bushes (paper or felt) · Fire (paper or felt) · Cloud (paper or felt) · Lightning bolt (paper or felt) · Storyboard, including the sun, the sky, and the ground (paper or felt) · Roots - they should be separate pieces from the plants (paper or felt) · Burnt plants (paper or felt) · Fired up for Land Preservation book (available for check out in the Transforming Spaces curriculum trunk) |
Set Up: · Gather students in a circle. · Have paper or felt story items organized and ready for use in a box
|
Activity:
- Introduce the activity: Have you ever smelled smokey air, or seen a wildfire?
- Tell the story of wildfires together.
- What kinds of plants live in the forest? Hand out trees and plants for students and invite them to place them the story board. Hand out roots for students to place beneath the plants, and explain they will be an important part of the story.
- What kind of animals live in the forest? Hand out animals and invite students to place them on the story board.
- Set the scene: it’s a hot summer day, and it hasn’t rained in weeks. Along comes a storm cloud, and it’s going to create lightning. Place the cloud on the storyboard.
- What kind of sound does lightning make? Tell students that on the count of three, they’re going to clap, and lightning will hit a tree.
- What will happen to our tree now that it’s been struck by lightning? Place fire on the storyboard.
- What will the animals do? They will run away from the fire. Take animals off the story board.
- What happens to the plants? Some plants and trees will burn. Remove some from the story board. Some roots may burn, but not all of them. Take only some roots off the story board.
- Explain that some plants are resilient against fire. Lodgepole pine trees, for example, need fire to release their seeds and reproduce. While plants may burn, their roots may stay intact and grow again.
- Hand plants back to students and invite them to place them back on the board on top of the remaining roots. Some animals, like whitetail deer, love new growth after fire.
- Use the Fire on the Land book to reflect and learn from Assiniboine and Sioux perspectives about wildfire and land management (available for check out in the Transforming Spaces curriculum trunk). Why do wildfires happen? How can we be safe around wildfires?
Extension:
- Students may create their own plants and animals to add to the story board.
- Older students may use this as a research project to understand what kinds native of plants and animals grow together and how they respond to wildfires.
spectrUM Pedagogy:
Inspire Curiosity: Ask open-ended questions and encourage creative thinking.
Encourage Growth Mindset: Encourage critical thinking skills by inquiry-based learning during storytelling.
Make Meaning: Create personal connections between science and students by asking them about their relationship with plants, animals, and wildfire.
Navigate Your Future: Let students know about resources and opportunities for them to continue to pursue an interest in wildfire, such as classes, clubs, camps, and higher education.
Collaborate With Communities: spectrUM has collaborated with many tribal representatives to connect science with Indigenous traditions. These resources can be found on spectrUM’s website, umt.edu/spectrUM.
Try It: Encourage student autonomy by providing them the opportunity to build their pollinators and problem-solve independently.
